Keeping Your Brother Sewing Machine in Tip-Top Shape…
Are you noticing that your stitches aren’t as smooth as they once were, or perhaps your Brother sewing machine is starting to make those unsettling, grinding noises?
Then it’s likely time for some much-needed TLC, specifically, oiling your machine. In this comprehensive guide on “How to Oil a Brother Sewing Machine,” we’ll dive into why this maintenance step is crucial, when you should do it, and a detailed, step-by-step process to ensure that your machine keeps running like a dream.
Proper oiling is key not only to the machine’s performance but also to its longevity, ensuring that you can continue to sew, quilt, or embroider without any hitches.
So let’s jump in and learn how to keep your Brother sewing machine working smoothly for years to come.
No More Squeaks: Expert Tips on Oiling Your Brother Sewing Machine
Why Regular Oiling is Essential
At the heart of every Brother sewing machine lies an intricate system of gears, hooks, and moving parts. Like any piece of precision machinery, these Brother Sewing Machine Parts require regular lubrication to function smoothly. Oiling reduces friction, prevents rust, and ensures that your machine’s internal parts remain in top condition.
Recognizing When Your Machine Needs Oiling
Your Brother’s sewing machine will often let you know when it’s time for a bit of TLC. Listen for any unusual noises, like squeaks or grinding sounds. Difficulty turning the handwheel or inconsistent stitch quality can also be indicators. Remember, though, even if your machine seems fine, it’s still wise to oil it routinely – prevention is always better than cure.
Selecting the Right Oil for Brother Sewing Machine
Not all oils are made equal. Always use sewing machine oil. This oil is clear and specifically designed to lubricate without leaving a residue that can damage your fabric or gum up the machine. Avoid using household oils or WD-40, as these can cause more harm than good.

Step-by-Step: Oiling Your Brother Sewing Machine
Maintaining your Brother sewing machine is an essential aspect of ensuring its longevity and optimal performance. Oiling, in particular, is vital for the smooth functioning of the machine, preventing excessive wear and ensuring consistent stitch quality. Here’s a detailed step-by-step guide to help you through the oiling process:
Step-1. Safety First
Before diving into the oiling process, always prioritize safety.
Turn Off & Unplug: Disconnect your sewing machine from any power source. This step ensures there’s no risk of accidental activation during the maintenance process.
Cool Down: If you’ve been using your machine, allow it some time to cool down. Working on a machine that’s recently been in use can be hazardous, especially around the bulb area.

Step-2. Preparation
Setting up your workspace correctly can make the oiling process much more straightforward.
Workspace Protection: Place a towel or absorbent cloth beneath the sewing machine to catch any accidental drips.
Gather Supplies: Keep your sewing machine oil, a small brush or Q-tip, and a soft lint-free cloth within arm’s reach.
Step-3. Access the Machine
Getting to the parts of the machine that need oiling is crucial.
Consult the Manual: Different Brother models might have slight variations. Always refer to your specific machine’s manual to understand the proper access points and areas requiring oil.
Disassemble Necessary Parts: As a general rule, remove the needle to prevent any injury. Take out the presser foot to have a clearer view and access, and remove the bobbin and bobbin case to access the hook area.
Further Reading: All Brother sewing machine manual pdf
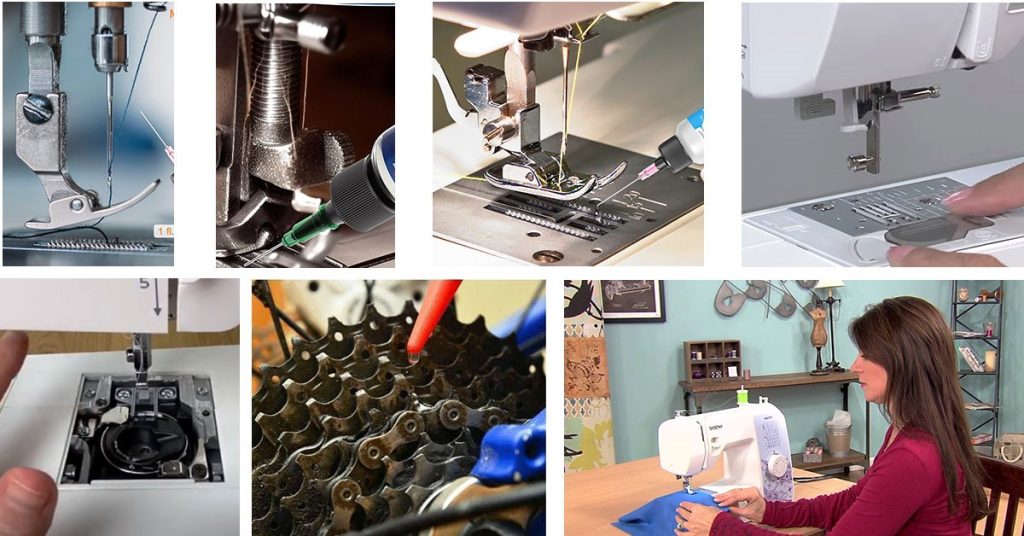
Step-4. Oiling Brother Sewing Machine
Ensuring that the delicate inner mechanisms of your sewing machine are well-lubricated is the crux of the entire maintenance process. Proper oiling guarantees that the parts move smoothly, reducing wear and tear, and resulting in consistent, high-quality stitches. Here’s how to do it effectively:
a. Identify Oiling Points
Before you begin, it’s paramount to know where to apply the oil. The oiling points are typically the machine’s moving parts where metal rubs against metal.
Consult Your Manual: Every Brother’s sewing machine model might differ slightly. Your user manual will typically have a maintenance section highlighting the exact oiling points.
Common Oiling Points: It’s important to note that specific oiling points can vary between different models of Brother sewing machines. Therefore, it’s crucial to refer to the user manual or maintenance guide that comes with your specific model for accurate information. However, I can provide you with some general guidelines on where you might find oiling points on a typical sewing machine:
[su_list icon=”icon: arrow-right” icon_color=”#02810b”]
- Bobbin area: Apply a drop of oil to the moving parts in the bobbin area, including the shuttle hook, race, and other moving components. Be sure to follow the manufacturer’s recommendations on the type of oil to use.
- Needle bar: Locate the needle bar, which moves up and down with the needle. Apply a small amount of oil to the joints and any moving parts.
- Presser foot lever: Apply oil to the joints and moving parts of the presser foot lever.
- Feed dogs: Some machines have oiling points for the feed dogs, which are the teeth that move the fabric as you sew. Check your manual for guidance on oiling the feed dogs.
- Take-up lever: Apply a drop of oil to the take-up lever, which is responsible for the up and down movement of the thread.
[/su_list]

b. Apply Oil Sparingly
Now that you’ve identified where to oil, it’s time to get to the actual application. The key here is to be precise and conservative.
Using the Right Tools: Whether it’s a brush or the nozzle of your sewing oil bottle, ensure it allows for accurate application. Some prefer using a Q-tip for hard-to-reach areas.
One Drop at a Time: Direct the brush or nozzle to the identified oiling point and gently apply one or two drops. It might seem like a small amount, but sewing machines are designed to function with minimal lubrication.
Beware of Over-Oiling: It’s easy to assume that more oil means smoother operation, but this isn’t the case. Excessive oil can attract dust and lint, which over time can gum up the machine’s mechanisms, leading to more frequent maintenance requirements or even potential repairs.
By giving attention to detail during the oiling process and ensuring that you lubricate the correct points without overdoing it, you set your Brother sewing machine up for success. It’s a small step in the maintenance process, but it’s undeniably one of the most crucial ones for the machine’s long-term performance and your sewing satisfaction.
[su_note note_color=”#dbdffc”]
4.1. Oiling the Brother XM2701 Sewing Machine:
The Brother XM2701 is an affordable and reliable machine that, with proper maintenance, can serve for years. When oiling, the primary focus should be on the shuttle race. However, always refer to the machine’s manual for additional oiling points.
Shuttle Race:
- Accessing the Shuttle Race:


- First, turn off and unplug your Brother XM2701 sewing machine to ensure safety.
- Raise the needle to its highest point.
- Remove the flatbed attachment of your sewing machine to expose the free arm. This will give you easier access to the bobbin area.
- Open the bobbin cover plate by gently sliding it towards you. It will pop up.
- Remove the bobbin and bobbin case by lifting them out.
Lubricating the Shuttle Race:
- Identify the shuttle race area. It’s the circular metal piece where the bobbin case sits.
- Apply a drop or two of sewing machine oil onto the shuttle race.
- Avoid over-oiling. Excessive oil can attract lint and dust, potentially hindering the machine’s performance.
Other Oiling Points:
- Consult the Manual: The Brother XM2701 typically doesn’t have many oiling points aside from the shuttle race. However, always check the user’s manual to confirm any additional areas that might need attention.
- Points to Remember:
- Only use sewing machine oil. Do not use household oils or any other substitutes, as these can damage the machine or affect its operation.
- After oiling, use a soft, lint-free cloth to wipe away any excess oil that might be present on the machine’s surface.
Post-Oiling:
- Reassemble:
- Carefully replace the bobbin case and bobbin into their original positions.
- Slide back the bobbin cover plate until it clicks into place.
- Reattach the flatbed attachment if you have removed it.
- Test Run:
Plug the machine back in and turn it on.
Using a scrap fabric, do a test run to make sure the machine runs smoothly and that no excess oil transfers onto the fabric.
Regular oiling and maintenance of your Brother XM2701 sewing machine ensure its smooth operation, longevity, and optimal performance. Proper care can enhance the machine’s life and the quality of your sewing projects. Always remember to use the right type of oil and refer to the manual for any specific care instructions.
4.2. Oiling the Brother JX2517 Sewing Machine:
Shuttle Race:
Identification: The shuttle race is the circular metal component located beneath the bobbin case. In the Brother JX2517, as with most sewing machines, this is an essential point that requires periodic lubrication.

Application:
- Remove the bobbin case to expose the shuttle race.
- Holding your sewing machine oil, carefully apply a drop or two directly onto the shuttle race. It’s essential to use the oil specifically designed for sewing machines.
Precautions:
- While oiling is vital for the smooth operation of the Brother JX2517, overdoing it can cause problems. Over-lubrication can become a magnet for dust and lint. This accumulated debris can affect stitch quality and the overall performance of the machine.
- It’s advisable to clean the area around the shuttle race occasionally, removing lint and debris, before applying the oil. A small brush can be helpful for this purpose.
Other Oiling Points:
While the shuttle race is the primary focus, the Brother JX2517 may have other areas that benefit from oiling. These areas are generally those where metal parts move against one another.
Referring to the Manual:
- It’s imperative to consult the user’s manual of the Brother JX2517 for specific oiling instructions and points. The manual will provide insights into any additional areas that may need attention.
- Some modern machines come pre-lubricated from the factory and may not require frequent oiling. The manual will provide clarity on this aspect as well.
In conclusion, while oiling is crucial for the upkeep and smooth operation of the Brother JX2517, it’s equally important to do it correctly and with the right type of oil. Regular maintenance ensures that your machine remains in top condition, providing consistent and high-quality stitches for all your sewing endeavors.
Step-5. Cleanup
Post-oiling, cleanliness ensures optimal function and prevents any staining on future projects.
- Wipe Excess: Using the soft cloth, gently wipe away any excess oil from the machine’s surface and any areas where you’ve applied the oil.
- Reassemble: Once you’re confident that everything is clean, reinsert the bobbin, bobbin case, presser foot, and needle.
Step-6. Test
Before diving back into your sewing projects, always test the machine post-maintenance.
- Stitch a Scrap: Using a piece of scrap fabric, sew a few lines to ensure the machine operates smoothly. This step also helps in distributing the oil and ensuring there’s no excess that might transfer onto your projects.
By following this detailed guide, you ensure that your Brother sewing machine remains in peak condition, offering you years of seamless sewing experiences. Regular maintenance not only prolongs the life of your machine but also elevates the quality of your sewing projects.[/su_note]

Troubleshooting Post-Oiling Issues with Your Brother Sewing Machine
Oiling your Brother sewing machine is a fundamental maintenance step that ensures its smooth operation and longevity. But what if, after following all the correct oiling procedures, you still face some hitches? Maybe the machine sounds off, or the stitches just aren’t coming out right? Don’t panic. Let’s delve deeper into troubleshooting post-oiling issues and get your machine back on track.
1. Persistent Noise:
Cause: Even after oiling, if your Brother sewing machine continues making unusual sounds, there might be residual lint or thread caught inside.
Solution: Thoroughly clean the bobbin area and around the feed dogs. Sometimes, a simple cleaning can resolve the issue.
2. Inconsistent Stitches:
Cause: This might be due to misalignment or bending of the needle or imbalanced tension.
Solution: Replace the needle with a new one appropriate for your fabric. Check the tension settings, ensuring they are suited for your sewing project.
3. Oil Stains on Fabric:
Cause: Over-oiling is a common mistake. If there’s too much oil, it can seep out and stain your fabric.
Solution: Run the machine on some scrap fabric until the excess oil is soaked up. Always remember to oil sparingly in the future.
4. Machine Feels ‘Tight’ or ‘Stiff’:
Cause: It’s possible that not all moving parts were adequately lubricated.
Solution: Refer back to your Brother sewing machine manual to ensure all critical oiling points are addressed. Apply a drop of oil if any spots are missed.
5. Bobbin Issues:
Cause: Sometimes, the problem isn’t with the oiling but with the bobbin itself.
Solution: Ensure the bobbin is correctly wound and placed. An improperly wound bobbin can cause a multitude of sewing issues.
6. Skipped Stitches:
Cause: This could be a combination of needle, tension, or even threading issues.
Solution: Re-thread the machine, ensuring it follows the proper pathway. Double-check tension settings and replace the needle if necessary.
When to Seek Professional Help:
If, after trying all the troubleshooting tips, your Brother sewing machine still isn’t functioning optimally, it might be time for professional servicing. Complex internal issues, misalignments, or worn-out parts might be the culprits. A professional can provide a comprehensive check and ensure your machine is in top-notch condition.
While understanding “How to Oil a Brother Sewing Machine” is crucial, being adept at troubleshooting post-oiling issues is equally vital. With regular maintenance and a keen ear and eye for potential problems, you’ll ensure that your Brother sewing machine serves you seamlessly for years to come. Remember, when in doubt, always refer to the manual or seek professional advice.
Maintaining Your Brother Sewing Machine Beyond Oiling
While oiling is a critical aspect of ensuring your Brother sewing machine’s smooth operation, it’s merely a cog in the broader machinery of maintenance. Like any high-precision instrument, your sewing machine thrives on consistent care in multiple areas. From dusting to addressing wear and tear, let’s explore the holistic approach to maintaining your Brother sewing machine.
1. Regular Cleaning:
Importance: Over time, lint, thread fragments, and dust can accumulate, especially around the bobbin area and feed dogs. These particles can clog the machine, leading to uneven stitches or causing it to jam.
Solution: After each project, use a soft brush to clean the bobbin area and under the needle plate. For a more in-depth clean, consult your Brother sewing machine manual and disassemble parts that can be safely removed for cleaning.
2. Needle Replacement:
Importance: A worn-out or bent needle not only affects stitch quality but can also harm your machine or fabric. Regularly using the correct needle type ensures precise stitches and reduces wear on your machine.
Solution: Change needles after every 8-10 hours of sewing or after finishing a large project. Always choose the needle size and type appropriate for the fabric you’re working with.
3. Dust Protection:
Importance: Dust is a common enemy of sewing machines. When left unprotected, dust can settle into your machine, leading to decreased performance or even damage.
Solution: Always cover your Brother’s sewing machine with a dust cover or soft cloth when not in use. If you’re storing it for a more extended period, ensure it’s in a dry, cool place, away from direct sunlight.
4. Thread Quality:
Importance: Not all threads are created equal. Poor-quality thread can shed more lint, causing build-ups and potentially leading to tension issues.
Solution: Invest in good-quality thread. It not only benefits your machine’s health but also ensures your sewing projects have a polished finish.
5. Tension Adjustments:
Importance: Incorrect tension settings can strain your Brother sewing machine, leading to uneven stitches and potential long-term damage.
Solution: Regularly check the tension settings, especially when switching between different fabrics. Your Brother sewing machine manual will provide guidelines for optimal tension settings for various materials.
6. Moisture Protection:
Importance: Humidity can be detrimental to the internal components of your machine, causing parts to rust or degrade.
Solution: Store your machine in a low-humidity environment. If you live in a particularly humid area, consider using silica gel packets or investing in a dehumidifier for your sewing space.
While understanding “How to Oil a Brother Sewing Machine” is indispensable, a comprehensive maintenance routine encompasses so much more. By adopting a holistic approach, you ensure that your machine remains in peak condition, ready to tackle any project you throw its way. After all, a well-maintained machine is the cornerstone of a successful sewing journey. So, give your Brother sewing machine the care it deserves, and it’ll reward you with years of impeccable performance.
Conclusion of the How to Oil a Brother Sewing Machine
Learning “How to Oil a Brother Sewing Machine” is more than just a routine task—it’s a rite of passage for every sewist in the USA. It signifies a commitment to the craft, ensuring that our trusty machines continue to serve us project after project. Just as we change the oil in our cars or replace batteries in our devices, knowing the intricacies of oiling our Brother sewing machines is a testament to our dedication.
In the vast tapestry of sewing, this knowledge is a vital thread, ensuring our work remains seamless and our machines stay in peak condition. As you embrace this quintessential American DIY spirit, let the proper maintenance of your machine stand as a testament to your passion and precision. Sew on with confidence!